| DIY-Welder - Build your own Arc, MIG and TIG welder | Page hits: |
| DIY-Welder - Build your own Arc, MIG and TIG welder | Page hits: |
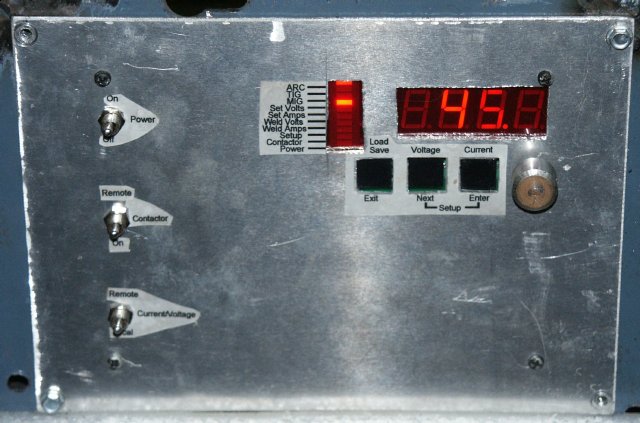
On/Off switch
Contactor switch - Allows output to be always on (stick welding) or controlled by a footpedal or wire feeder.
Current/Voltage switch - Allows set locally or remotely via footpedal or wire feeder.
10-LED bar display:
Arc - Arc mode
TIG - TIG mode
MIG - MIG mode
Set Volts - Display currently showing the programmed voltage
Set Current - Display currently showing the programmed current
slope.
Weld Volts - Display currently showing the output voltage
Weld Amps - Display Currently showing the output current.
Setup - Display is in setup mode.
Contactor - Shows if output is enabled.
Power - Blinks to show status.
These are all multi-function depending on the current mode. The top lables are for normal operation, the bottom labels are for setup functions.
The encoder (knob) is used to step up/down settings.
Load/Save - Press once and the display will show "LOnn" for Load and a number of the saved location. The knob can be turned to select the saved settings to recall. Pressing enter will load the settings.
Press again and the dispplay will show "SAnn", th knob can be used to select the location and pressing enter will save.
Voltage: Press and the dusplay will switch to voltage. If the contactor is off, it will show the set voltage and the knob will adjust the setting. If the contactor is on, it will show the output voltage. The mode is shown on the bar LED's. Pressing and holding the Voltage button will display thepower (battery) voltage.
Current: Press and the display will switch to current. If the contactor is off, it will display the set current slope and the knob will adjust the slope. If the contactor is on, it will display the output current.
Setup: Pressing the Voltage and Current switches together will enter setup mode. It will allow setting the mode (TIG/MIG/ARC), contactor options, TIG parameters, and some wiring options. This has yet to be programmed in.